These tea tins should look familiar to you: I've posted most of the pictures on the tins on my Flickr pages. |
| Finished tea tins |
I'm a tea addict AND a tea tin addict. I simply can't resist great packaging, like this one from Republic of Tea:
 |
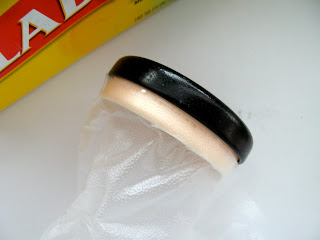
Part of the lid sits inside the top of the tin and is made of plastic to give a good seal. Wrap it with Press and Seal, being careful not to put it on the dark painted area:
Wad up the extra Press and Seal, making a little bundle:
Spray paint the lids and cans white. Oops, wash them in the dishwasher first - hand washing was not enough as you can see from the bubbled up paint I got on my first go-round:
Now for the fun! Scan and print art work or photos onto "waterslide decal paper". I used "inkjet clear" since my printer is an inkjet. I got mine at the local big box office store, but if that won't work for you , you can get it on Amazon .
Print the art work or photos onto the paper and let the ink dry for an hour or so. Then spray them with Crystal Clear Acrylic per the decal directions. You'll find it in craft stores with the Krylon spray paint cans and at hardware stores. Let the sheets dry. Cut out the part you want to put on a tin. I cut closely around the edges of the images at first, but then changed to just cutting a rectangle. The clear part hardly shows on the tins.
Put the decal you've cut out into a bowl of water, with the paper backing attached. In about 1 or two minutes you will be able to slip the backing paper off. Put the image on your tin and use a wet dishcloth to smooth the image down, starting each stroke from the middle of the image and working your way toward the edge. If you decide it's crooked, you can lift it up and re-place it. Voila! Now you can take a turn for the obsessive if you want.....you can use chalkboard paint to paint a circle on the lid and then use washable chalkboard markers to label the tins, but I just put P-Touch labels on mine since I didn't like the look of the black chalkboard paint I had on hand. Yes, I know it comes in other colors, but I still wear my new shoes out of the store like a grade-schooler, if you know what I mean. Instant gratification is hard to resist.


This is great! The tins turned out beautifully!
ReplyDeleteI love them!
ReplyDeleteWay cool! Now I wonder if I could use that decal idea some way on the cardboard chocolate milk cannisters I have "hoarded."
ReplyDeleteYou are a genius! Beautiful. clap clap clap!
ReplyDeleteLove this!
ReplyDeleteThis is stunning! I love your work. Who would have thought that you could transform a simple tea tin like this into such a masterpiece?
ReplyDeleteOh thank you Mother of Invention!! Hoarding? Not when something is put to good use!
ReplyDeleteThese are lovely. Its a good job we don't get tea in tins here in uk..I'd be hoarding too and I already have far too much stuff.
ReplyDeletePretty, Jeanette! and great instructions. I love the ones with your artwork on them.
ReplyDelete